Monday, January 19, 2015

The ADHD is REALLY Coming Out...

I'm all over the place now, with what I am making...Guess I'm trying to find my niche...but then again, I've been like that all my life...Took up decorative tole painting, macrame, made memory quilts and wall hangings from actual photographs...When my mom was in her eighties, I made her a memory quilt transferring many many family photos onto percale squares, then bordering the quilt with burgundy strips. It was awesome, but what was even more surprising to me, as I look back on it, I didn't have any instructions on how to make a quilt itself. I just sort of pieced it together and it came together. I think about that now, and I wonder how it did come together!? 

Then again, I am making a tee shirt quilt for my daughter, and other than a few directions on how to make tee shirts into quilt squares, I'm putting this together totally willy nilly and without any instructions. I did buy a couple of books to try and help me, and went on the internet to get some help, but nothing seemed to fit my vision of how I wanted it to look and I found the directions confusing. BUT--there's a LOT of help out there if you are thinking about making a tee shirt quilt. Mine is coming together ok.....Here's the front...Four squares across, and five squares down. Each tee shirt portion is from a 12" square, because that's the biggest square ruler I happened to have on hand. They probably should have been cut to 14" squares, as the twelve inch size made it difficult to get all the logo on the square in some cases. The sashing strips are 1 3/4" after seams were sewn. 
And here's the back...pieced in three sections with the polka dot part running down the middle. 
I love the lizard print! The tee shirts are many of her running race tee shirts for the past few years. It's costing me about about 75.00 for a bigger than lap size, but smaller than twin size to make. I used quality quilt fabrics and LOTS of iron on stabilizer fabric for the tee shirts.

I have no idea if I pieced the back together properly, or if this was the kosher thing to do, but I pieced the back in three sections, because the quilt ended up being bigger than I thought, and the fabric width wouldn't work for only having two sections. And I might add, I am NOT a math person, so measuring and cutting accurately is NOT one of my strengths. Most of my little quilt things like table toppers and wall hangings with little squares never come out straight and consistent. So I really bit off quite the big project in trying to figure this out. 

The hardest part of all, will be the quilting of the fabric. I was going to have it done professionally, until I found out that they needed a certain width all around the quilt to hold it in a quilting machine. And of course, I trimmed the quilt too close all around, so I can't use the quilt shop's quilting services! I think I will just hand quilt it in circles, like running around in circles, haha....That will take me awhile! She comes back from her tour of duty in the spring, so I have a little time....

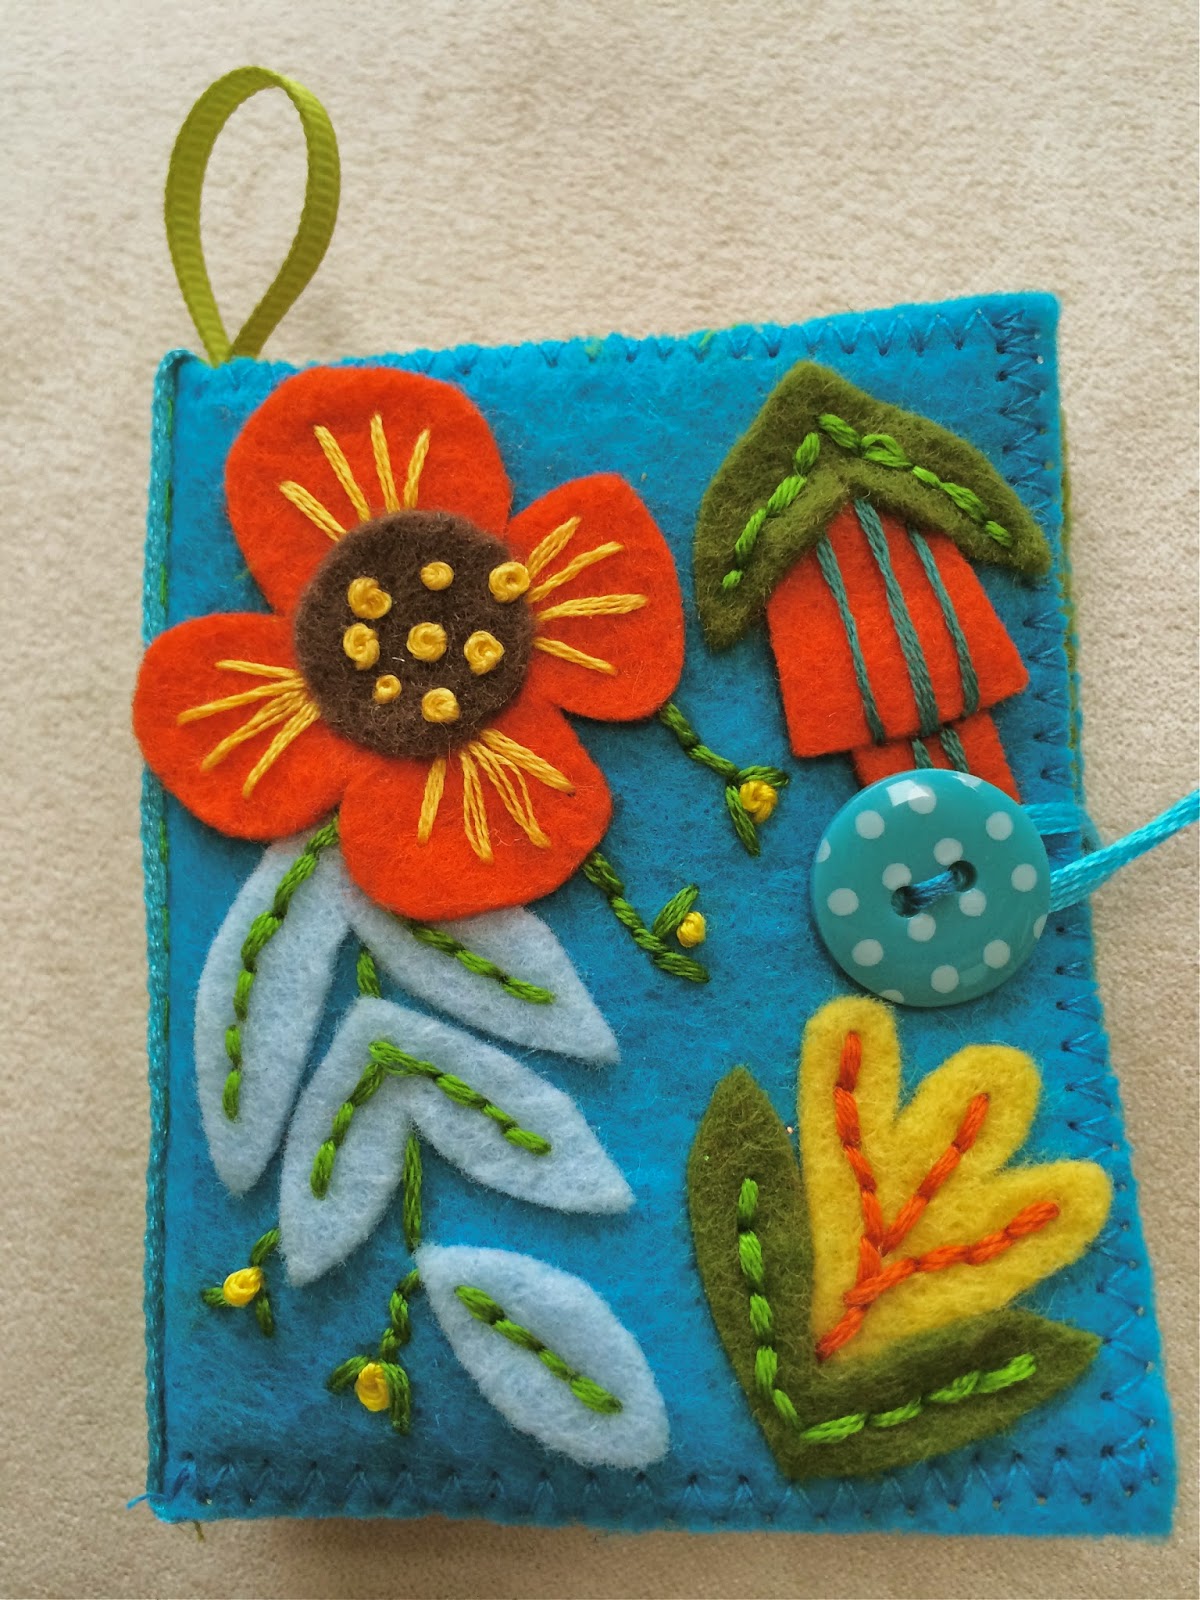
Now that I digressed from my original start of saying the ADHD is going full time, back to what else I'm delving into....Hand embroidered stuff....A needle book.....Made from beautiful quality felt. What a difference good fabric makes! This is a blend of wool and rayon felt. It's much thicker, and will not pill and fuzz as easily as the cheap stuff from Michael's and Hobby Lobby which is made from recycled plastic and that you can see through if you hold it up to the light. The pattern is from Larissa Holland at MMMCrafts. I love love love her patterns! The felt is from Benzie on Etsy, and there is another shop that has 100% wool felt, which I would love to try, and that shop is Felt on the Fly.
Here's another view...
Then I made a little mini duffel zippered pouch key ring...Going to make in several colors and put them in my Etsy shop, JeanBeanGifts.

And then I decided to make some earrings with Swarovski pearls, "two peas in a pod" earrings, these are also in my Etsy shop.

I think I'm going to make a necklace to match....And then, maybe some bird eggs in a nest...Oh, boy...I'm on a roll now, just thinking about this stuff gets me all excited.....Gotta go get crafting again...See ya later!

Saturday, December 27, 2014

A New Season Gets Underway....

Had a little flurry of sales for Christmas in my Etsy shop, JeanBeanGifts. I was really happy about that! My little bottle toppers were popular, along with my owl ornaments ("owl always love you"), also people bought my steampunk snowflakes, so that was wonderful, too. And I sold a cowl, so I will definitely keep making these things for next year, too.

So it's on to new things, thinking ahead to Valentine's Day and beyond that, spring! The days here in Bradenton are just about all like summer days, (it was 80 degrees the day after Christmas!) so it's hard to visualize the seasons and to motivate myself to making things that are pertinent to each season. But I try....I change out my dishtowels every month (I do wash them several times a month!) in some sort of theme...Like for February, I will be putting out my Valentine towels. 

They are not made by me, but some day I hope to get back to making appliquéd towels for my little shop. This is one I made for October a couple of years ago....
On a whim, I decided to make a little charm dangle or key chain/key fob that reminds me of one of my favorite animated movies by Pixar. It's called "Up." The movie is heartwarming, funny, and very well done. It's a love story, too! Carl, the elderly gentleman, who's pining the loss of his many years of happily wedded bliss to his Ellie, decides to tie a bunch of balloons to his house, and take off on an adventure. Little beknownst to him, a little explorer scout accidentally tags along. So here's my little charm/movie memorabilia piece.
It makes me happy to think about this movie, so I'm glad I made it. I'll probably put it in my little shop in case someone else wants to remember this movie, too.

I tried to knit a hat for my daughter serving overseas. It's getting cold at night where she is, but for some reason, I am having trouble with lace patterns these days. After tearing out the hat twice, (once for not doing a gauge and checking to see that it was going to be HUMONGOUS), I decided to give it a rest. But I do love this yarn, and I'm going to try again this week to find a different pattern that's not quite as frustrating. The worsted yarn I found is really pretty. It's a deep dark cherry with flecks of blue and gray in it...A Vanna's Choice yarn called Plum Jam.
Hope I can get this hat done soon! Before spring and warmer weather come her way!

Tuesday, December 9, 2014

Steampunk Holiday Knitting

WHA-A-A-T???  What the heck is that? Is there really such a thing as steampunk holiday knitting? Probably not...I just threw all those together because that's what I've been doing all at the same time, well sort of....Steampunk has to do with electronics, mechanical parts, fantasy, and steam machinery. It was originally a part of literature--science fiction set in Victorian times. Now, steampunk style loosely refers to using mechanical parts and machinery images, pieces, or themes with those science fiction elements in clothing or decor. So-o-o, I decided to use some clock parts and Tim Holtz gear pieces and make some snowflakes! Here is just one example.....I used Super Glue, which I was not too thrilled with, as if you are not really really careful, you might see a little white residue left behind after it dries...OR.....you might accidentally fuse your fingers together, not realizing you are getting the stuff on your fingers. (Ask me how I know....) I had one scary moment where SOMEHOW I got a tiny bit on my fingers and it ended up on one eyelash. I could feel the eyelash drying and I was screaming inside myself--"DONT' SHUT YOUR EYE, WHATEVER YOU DO, DON'T SHUT YOUR EYE!!!!!" I didn't....for enough seconds that it was ok...WHEW! I think I will use some different type of glue for more snowflakes, ya think?????
The gear pieces are widely available in packages at Michael's and Hobby Lobby and aren't necessarily Tim Holtz ones, but he is kind of the essence in the steampunk/grunge look scrapbooking supplies at the moment, in my humble opinion. He's got a lot of cool clock faces, hands, screws, nuts and bolts, and more stuff for scrapbookers looking for that sort of style in his "Ideology" design line....Here's a link to his cool stuff:  http://timholtz.com/new-2014-products-idea-ology/

OK, for the holiday stuff...I knit these cute bottle wine bottle toppers for my Etsy shop, JeanBeanGifts, just to see if anybody was interested. The pattern is from a blog called Simply Notable. A lady wrote and asked, "Can you make 36?" Can I? SURE! Can I do it within a certain time frame? You bet! Did I get carpal tunnel syndrome from knitting 36 of these little dudes in a week and a half? Almost!

Here is a photo of them on a trio of bottles. And yes, I did drink the wine for these!

I am making more of these as we speak, because....ANOTHER lady who purchased ONE bottle topper, bought it for a relative who runs a bottled water company and THAT lady wanted to use my photo of the hat on a water bottle. She asked if she could use the photo in a company newsletter that goes out to over 300 customers. I said, sure! WHAT WAS I THINKING???????  So far, no repercussions. I told her it's just little ole me knitting these little toppers, but I could make more, no problem.  Hahahahahaha...But I am going to make some more, JUST IN CASE.....

Speaking of drinking wine, I got some ideas from Etsy about using wine corks and decided to make some key chains from them. Here's a quick look at some I came up with, hard to be original with a basic wine cork and a key ring, but I'm going to try...I sealed the corks for better resiliency and popped a couple in my shop, JeanBeanGifts. http://etsy.com/shop/JeanBeanGifts

Now, being the ADD adult that I am and substitute teaching and having company come, in addition, I have to have lots of projects going at one time, so I do...My youngest daughter, says, Mom, can you make this hat I saw in Anthropologie's catalog? (It was EIGHTY-EIGHT dollars!) Yikes! I thought, well, of course I can make this hat, but of COURSE she wants the exact same yarn. The yarn was mentioned in the catalog description. It was a hand dyed Knit Collage yarn. I tracked it down. It ended up being 40.00 for ONE skein including shipping cost. YIKES! But---I am HOPING I can make a beanie with just the one skein. Otherwise, it's going to be ripped out and a headband will be made instead.
The worst thing about this yarn? I'm thinking it was made in the U.S. Nope! I can't remember where now, but it's NOT made in the U.S. I was so bummed!

Anything else on the table, Sparky? Yep! Thought I would make some of these cupcake hot pads and put them in the shop.
After sewing this one from the cutest little pattern ever, I couldn't sew through all the thicknesses with my little Brother Runway sewing machine. The pattern called for three thicknesses of Warm and Natural batting, OR one thickness of Warm and Natural, one of Insulbrite (the stuff that protects your hand from burning) and the two pieces of your fabric sandwiched together. Well, I had the brilliant idea of using TWO pieces of warm and natural with one layer of Insulbrite, and by the time I got the final topper part onto the bottom, which has the same thicknesses as the topper part, there was no way on earth I could join them together without breaking my machine needle. (Ask me how I know...) So now, I am sewing the two sections together by hand with blanket stitch and to me, it looks bad. No more fabric like it to give it another try and besides, I'm disgusted with how hard it is to pull the needle through with a pair of pliers. No joke, folks, I'm pulling the needle for the blanket stitch through all those thicknesses of fabric with a pair of pliers. It's slow going for sure...I'll just keep it for me for the holidays...sigh....

Almost time to think about making some things for Valentine's Day!   Geesh! One holiday at a time, Jeannie!  But I AM having fun....(she says....)  I probably won't post till after Christmas, so have a wonderful holiday with your loved ones!     Happy crafting!


Sunday, September 21, 2014

Fall Season, Oh, Yeah!

I love fall very much...The temperatures cool down, the crisp mornings motivate me to take walks often, and I look forward to snowy days. Unfortunately, we have traded awful winters with cold, snow, sleet and ice for life in "paradise" with palm trees, dolphins, manatees and amazing birds. I wish I could still be up north to see the leaves, but that's not where life has led me. I've had a really hard time this summer, because we have had record heat and humidity. But, it's starting to get a little better...Temperatures are in the high eighties, and that might seem very warm to most people, but to us, it's an amazing difference in temperature. The humidity is coming down, too. I love it when football season rolls around, not because I like to watch football, but because it's a symbol for fall and cooler weather. Even if cooler weather is not here, psychologically, I feel better, knowing it's coming for other people!

So-o-o-o-o-o...I'm into my fall crafting mode full swing, in-between substitute teaching, making things to put in my Etsy shop, JeanBeanGifts....Here's what I've been making....A fall/Halloween table runner....

A pumpkin orange wrap leather bracelet that has macrame stitches interspersed along stretches with beads....This was really fun to make and patterns for this style bracelet can be found on Beadshop.com.

A folk art wool table topper, totally hand embroidered down to the little French knots on the sheep, stem stitch, lazy daisy stitching and hand embroidered blanket stitching all the way around each motif and the topper's edge....This was a "Saltbox" table runner pattern I've had in my stash for YEARS and decided to use the wool kit and the pattern to make it up. It's for sale in my Etsy shop, JeanBeanGifts along with all these other things I've been making.
Here's what it looks like from above....

Starting to make mini sweater ornaments for the holiday season, they will be in my shop soon on Etsy. Right now I am concentrating on fall things and getting a bunch of inventory made for a craft show November 1st. Decided to make some kid things...a little monkey coin purse...
A little doggie coin purse....
And have decided to drag out my punch needle supplies and do some holiday and fall Halloween ornaments. I used to do quite a bit of that when I had a more traditional "up north" decor in my house. Punch needle patterns are usually shown in a primitive, more country style palette of color. Now that I'm in Florida, it just isn't quite the look to place here in my house unless I decide to do some lighter color punch needle stitching. I'll be back with photos and how it's done in a couple of weeks!

See you later....

Wednesday, August 27, 2014

Working with Japanese Delica Beads and Peyote Stitch

I've been making leather wrapped bracelets for awhile, then I moved into loomed bracelets, and now, I'm interested in making bracelets and earrings with Miyuki (the Japanese company name) delica beads. These are a tiny, tiny little barrel bead, a little cylinder. They have relatively large holes for such a tiny bead, so they can accommodate several passes of beading threads. They are high quality and uniformly made, which makes them wonderful for beading on a bracelet, or making earrings. They come in four sizes-- size 15/0, 11/0, 10/0, and 8/0.  It seems to me that the most common sizes used are 8/0's, 11/0's, and 15/0's. More than 70 of the size 11/0's fit on the head of a penny! Gonna need good lighting and good eyes to work with these! Might even need a magnifying light after awhile, we'll see....

I took a class on making a peyote stitch sea star pendant awhile back....I really loved it. We used regular seed beads at the time for this project, size 8/0 and 11/0. I made my sea star into a Christmas tree ornament by adding a little dangle and a pretty metallic silver ribbon. the ornament is done in peyote stitch, which is a method of stitching beads together, one by one, with a needle and thread, an off the loom stitch. The pattern of the beads in what way they lay, with one bead a little up, the next bead a little down, is called peyote stitch.  There is even count peyote, and odd count peyote stitch. You use it to make strips or flat pattern pieces like for bracelets or, you can make it into little tubes, like I did for my pen wrap.. Peyote stitch is used a lot in Native American bead work, which is something that really appeals to me.  This pen wrap pattern is from Out of the Flames designer, Lori, who has a shop by that name on Etsy. She has many many beautiful Native American patterns in her shop. The pen wrap was made flat, then stitched up like a zipper once the pattern was completed.

This sea star pattern was worked in peyote stitch in the round.

After having fun and frustration with the sea star, but definitely more fun, I decided to tackle the tiny delicas....Up came another class...A very pretty bracelet class called "Cotton Candy". This pattern was from a lady by the name of Fatima Menson-Potter. She used multicolored delica beads in a size 11 for the first few rounds, and then a very pretty pink for the main color, size 11/0. I liked it so much I chose the same color combo.
And here is my completed peyote stitch bracelet! I've sewn Swarovski pearls and drops onto the top in a diagonal back and forth direction on the surface to add some "bling".

How do you start peyote stitch? For this bracelet, I strung a whole bunch of delica beads on a piece of Fireline beading thread. A whole bunch, as in about 140. Then you thread a bead on your needle, and skip the first bead and pass your thread through the second bead. Skip the next bead, pass your thread through the following bead. I had to watch a lot of YouTube videos to remember how to do it. The first row or two is hard to hang onto, the beads are so small, but you get a little piece that looks like a set of zipper teeth once you have completed the second row.
From there, each "uppity" stitch gets the thread passed through so the up and down bumps pattern continues through the entire piece as you follow the color directions. What's really amazing is the fantastic patterns that evolve as you follow a color chart or a written chart to make the design.

Some people prefer following the color chart. I have terrible spatial and directionality problems so this way is not for me.

Some people prefer the written directions instead, (like the ones below). That would be me! What I do to keep myself on track and not lose my spot is to first put my pattern inside a clear, plastic page protector. Then I take a piece of hot pink highlighter tape (sometimes available in office supply stores, but I got mine at the local knitting shop) and put it under the line I am going to start working on.
Then I take a dry erase marker and divide the current row I'm working on--if it's a long one, into sections of four bead sequences at a time with a "tick" mark or vertical dividing line, so I only have to remember a bead sequence of 4 colors at any one time in the row. That way my brain only sees four color directions at at time. If I didn't have those dividing lines, every time I look away from the row pattern to pick up my beads, I would lose my spot. It took me a BUNCH of counting and recounting, going back and forth many many times before I hit on the system of "chunking" all this information into something I can keep track of and not lose my place. When I 'm ready for the next row, I peel the tape off the plastic sheet, move it to the next row, divide all the instructions into sections of four instructions at a time once again, then I'm ready to go again!

And the last amazing thing about peyote stitch, is that you have hand stitched each and every single one of these teeny tiny little beads to each other, which takes hours of work for a beginner, and not so many hours for an experienced stitcher. We're talking over a thousand beads! That first pen wrap at the top of the blog? One thousand, nine hundred thirty-two beads!

My first pen wrap took me about six hours to make. My second one took all day because 1) the pattern was much more difficult, 2) the beads were more transparent and close in color, 3) I didn't have very good lighting to see the differences between my colors, and 4) I kept associating the letter "B" with the color black when it was supposed to be SILVER!  Ar-r-r-r-r-g-g-g-g-g-h-h-h! But I persevered and got it done, and I'm actually going to make a third one! These are for sale in my Etsy shop, JeanBeanGifts.  Http://etsy.com/shop/JeanBeanGifts The pens are couple with cute journals making a nice holiday gift for someone.

For anybody going to try to learn peyote stitch, I suggest watching a lot of YouTube videos first, then taking a class if you can possibly find one in your locality. I'm lucky in that we have a couple of bead stores in the Bradenton/Sarasota area with wonderful ladies who will help me if I get stuck. :-)  Needless to say, I support my local bead shops when I can instead of going on the internet. :-)

And what's my next project? Getting ready for fall....reducing some of my stash, making mini sweater ornaments for holiday tree decorating, making more cowls, and creating some jewelry---earrings to be exact. After looking at some high earring prices in some of the fancier clothing catalogs, I'm going to make some of my own!

What's in your stash?

                                      Jeannie


Monday, July 7, 2014

Still Behind But Having Fun

Having the short attention span that I do, I keep moving around different crafts and trying different things. When it was much cooler, although Florida doesn't get much cooler, I was into knitting. It's in the mid nineties every day now, so knitting just doesn't do it for me.

Back to beading!  I decided to take a class on how to make a beaded starfish. Just one problem, it's peyote stitch, and I had never done that. YouTube to the rescue...Umpteen videos later and lots of repeats, I think I can do the sea star. So off to class I go....Anybody working with me has to have the patience of Job, because I have a terrible time following written directions and need LOTS of handholding and repeated auditory directions coupled with visual cues. This class had wonderful pictorial directions and they were very well written, but I still had trouble. The instructor had a VERY heavy European accent, so she was a little difficult to understand. She persevered, and I persevered, and in the end, VOILA! A sea star in peyote stitch. I like the cream colored beads (Miyuki) that are gold lined. It makes the starfish have a golden sparkly highlight finish in the daylight. Going to hang this as an ornament on my holiday tree, or make a pendant out of it.

So of course, I had to purchase more beads to make more starfish. I started my second one....Hmmmmmm, something is not going right. Back to the store I went to get some help. Got it! Back home I went. Hey, this is pretty easy, and I'm sailing right along. I was already on row 10 in a matter of minutes as opposed to hours when I took the class. But it didn't look right.

What a sad little star!
The sea star was curving dramatically, and the white rows in between weren't looking right. I called the store to ask for help over the phone. She told me the star was supposed to curve as you work. Not like this, lady! I had already made two trips back to the store to get help on starting my second star, and I was bound and determined to figure out what I was doing wrong on my own. Plus, I was embarrassed at how awful this one looked.

I sat back down and realized, AHA! I wasn't doing the peyote stitch, which has alternating beads a little up and a little down if you are doing it right. I was just stringing beads on a string. No wonder it wasn't setting right! I tore it all out and started again.

This time, I got it! Just about done here.....All I need to do is add little teardrops at the points, a reinforcing pentagon on the back so it can be hung or made into a pin, and it's finished.

At the same time,  I decided to try my hand at a loomed beaded bracelet. Back to YouTube and Beadshop.com which has some wonderful bracelet videos....Here are two very different examples of a loomed bracelet. I just love the idea of making something on a loom.


And another project is in the works...You can buy a plastic loom that looks like this...Or a wooden one called "Rick's loom" which reduces the number of warp threads to tie in at the end as opposed to the plastic loom.
Beadalon plastic loom
Rick's beading loom

Or you can simply use a deep dish tray and tie warp threads around the box. You could use a shoe box, but I love that this tray has a velvet insert to keep the beads from rolling around while I'm working on the bracelet. I got the tray from Beadshop.com. The inserts come in different colors.
I like the colors of this bracelet. They are earthy and remind me of the canyons out west. Beadshop.com has a similarly colored bracelet that inspired me called the "Grand Canyon". I'm going to make my bracelet narrower than theirs and was thinking about attaching this to leather cord. I should have attached the leather cord at the beginning, but as a crafter, you can change your mind and  do whatever you think might work! Or, if you are like me, you change your mind often while working on the same project! We'll see how this turns out.....Lots of choices in how to finish, so I'm going to get stymied if I overthink this. 

Just a thought...Seems like winding the threads all the way around the box wastes thread but instructions for the tray have you wrap the warp threads this way, so that must be how it is to be! I was thinking little nail heads at the each end of the tray would mean you could run warp threads just on the top instead of all the way around, maybe knot each one at the end? And then you wouldn't waste so much thread? Kind of like those pot holder looms we used to use when we were kids. I looked at the directions for Rick's Loom and they seemed a little more complicated than using this bead tray, so here I am with this.

Started this one and about ten rows in, realized that some of my warp threads were sticking up over the beads. I had not caught them properly when passing my threaded needle through the beads....sigh!  Started over again, and this time, it's going well.....This bracelet (above) is made from 8/0 beads, several with that beautiful picasso finish. (A picasso finish is added to the surface of a bead, usually green or brown to add a mottled appearance making the bead resemble a gemstone.) I absolutely LOVE picasso colored beads!

Not sure how I'm going to finish the ends yet. Might use ultra suede leather tabs on each end with a button, or might use metal ribbon crimps. We shall see. Maybe we can take a vote!

Back to crafting......Until next time.....

Wednesday, June 4, 2014

School's Out for the Summer!

Now, I have no excuses for not cranking out some great stuff for my little shop. Hope to some day be able to say making some things for my shop without feeling I have to qualify the description! It is growing a little bit...Have had some outside sales other than my family, haha. Also have 30 followers now, which isn't a lot. Still learning how to promote the shop and draw traffic and "tag" my creations so people can find them. Think I'll go looking for books, like e-books to help me understand Etsy better. One thing I do like about Etsy, is that people are very friendly and willing to share tips on building sales. One thing I do NOT like about Etsy, is people email me quite often asking HOW do I do certain things, without ever making a purchase, so I'm sure they are thinking about making something very similar to what I have. Phooey! 

I like working with memory wire...It's a lot quicker than making wrapped beaded leather bracelets, so I've decided to branch out into memory wire bracelets and some earrings. Here is my second memory wire bracelet, a 5X wrap....with a little bronze charm attached. I put it in my shop. (Of course!) http://etsy.com/shop/JeanBeanGifts
I used some sea green picasso beads...Picasso is a style of finish on Czech glass beads...The finish adds elements of brown or green to the surface of the bead in an irregular pattern. I understand them to be made in small batches by hand. I think they are absolutely beautiful and there are some incredible colors out there. Here are just a few in my bead stash....
And here a few photos from the web of some more gorgeous picasso beads...These are blue and topaz...
Opaque pink and fuchsia...wow! 

While I've been collecting beads for earrings lately, I've been trying to design some cute packaging for anybody who buys something from my shop. I might do it this way for my bracelets and earrings...a handmade little pillow box out of scrapbook paper, I got the pattern on the web. Here's the link...http://www.homemade-gifts-made-easy.com/gift-box-templates.html#pillow
Or I might do a little kraft box with scrapbook paper trim with a complementary color tag. I will tie the tag on with a complementary color baker's twine, in this case, red and white. 

Going to try my hand at some earrings this week....Until next time...keep on crafting! Or whatever it is you are doing!

Jeannie